Updating client guide
From 4.1.8 version of 3DPrinterOS, the client has ability to update when a new version is available. Here is the guide how to update client on different platforms.
Windows:
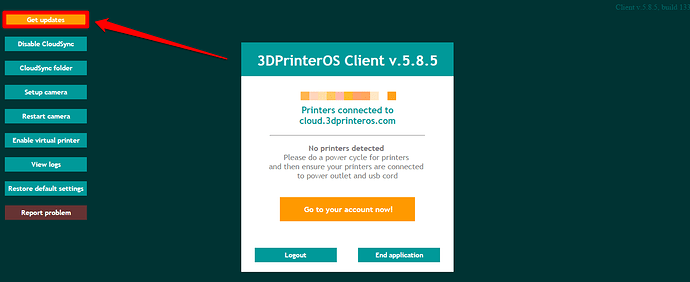
When updates are available on main page of 3DPrinterOS client the button “Get updates” appears.
So to update:
Press “Get updates”
-
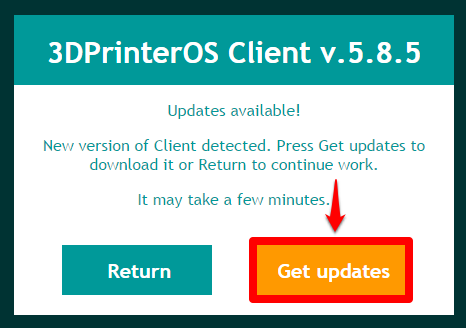
On the next page press " Get updates"

-
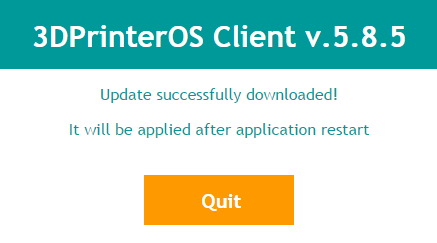
Wait for a few seconds - after that, this message appears.

Also you can just get a new install package from https://cloud.3dprinteros.com/printing/ by clicking ‘‘Install’’
Ubuntu:
You can update your 3DPrinterOS client by downloading lastest deb-package from https://cloud.3dprinteros.com/printing/ and clicking ‘‘Install’’.
Also you can update from 3DPrinterOS repository.
For that you need:
- Run terminal (Ctrl+Alt+T or from programs menu)
- Login as root. Execute “sudo su” in terminal
- Execute commands:
Only first time!
wget -qO - http://repository.3dprinteros.com/Release.key | sudo apt-key add -
echo "deb http://repository.3dprinteros.com/ all main" >> /etc/apt/sources.list
And then:
apt-get update
apt-get install 3dprinteros-client
And then you will have lastest version of 3DPrinterOS client!
RPi:
Here is the guide how to update client on RPi. Also you can update from repository the same way as on Ubuntu.
MacOS X:
Updating client for MacOS X is unavailable because of Apple policy. So the only way to update is to download a new package from https://cloud.3dprinteros.com/printing/

